play ps1 games on android
Showing posts with label blogging. Show all posts

HTTPS now Officially Available For Custom Blogger Domains

Good news Google has just officially released the HTTPS support for custom blogger domain. The service was previously available to only blogspot blogs. In the past blogger did provide the blogger draft to enable HTTPS on a custom blogger domain. But that feature was in beta and wasn't used by many bloggers who have a custom domain. Now Google has just officially released the SSL (https) support for custom blogger domains. This is not beta version and is fully tested.
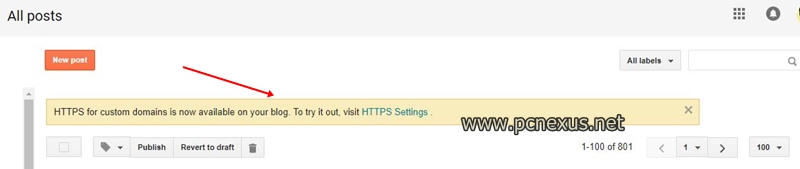
ssl custom blogger domain

So, if your blog is being hosted on blogger with a custom domain then you should enable https for your blog's security. First of all the SSL certificate comes from Google and it is totally free. Having https on your website also helps it to improve its search rankings. Don't worry about the mixed content issues if all your images and content is on blogger. Because blogger uses https and if you enable this feature then mixed content issues won't affect your blog. You can also redirect http to https to prevent any 404 errors.
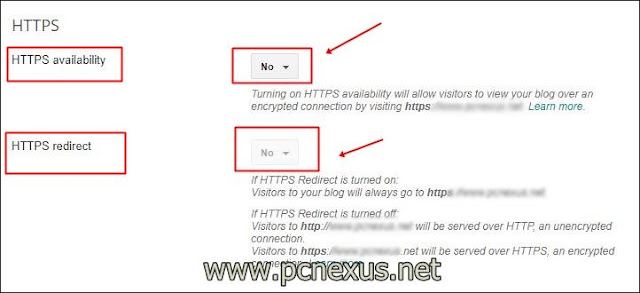
Enable HTTPS on Custom Blogger Domain

  • Login to your blogger account.
  • Go to 'Settings>Basic'.
  • Under 'HTTPS' enable 'HTTPS availability' by select 'Yes'.
  • Also enable 'HTTPS redirect' to prevent any 404 errors from your previous http hyperlinks.

official https for custom blogger domain

  • Wait for few minutes and that's it.
  • Your custom blogger domain now have a free SSL certificate that costs nothing and have a high security because it is provided by Google.

So let us know if you are enabling the HTTPS on your custom blogger domain or not.

Weird Things Happening On Google's Blogger : Might Be A Bug

Since 4th May 2015 Google's Blogger having some template related issues in which many bloggers are experiencing template related problems. This might be due to a bug in blogger.com or some other technical issue. I am listing the problems in blogger that are currently annoying bloggers around the globe.

Problems In Blogger.com In May 2015


  • We are unable to Edit HTML code of our templates. If we do so the changes are not saved by blogger template.
  • The homepage of our blogs got corrupted and we can't see the "Read More" link. The whole post is visible instead of Read More page break. This can't be fixed right now.
  • The post-body of my blogger blog is behaving like as if it is a default blogger template, however the changes can be made in right side bar and footer.
  • We can't add Google Adsense ads below post title and immediately below where post ends that is above comments section. <data:post.body> tags are missing in templates.
  • The blogger blogs are loading slower.
  • There is a slight increase in traffic on blogs hosting on blogger.com.
  • Some say that their blogger posts overlap each other.
  • Wallpaper can't be seen on some blogs.
  • Widgets doesn't appear.
  • bX-pkvvio error annoying some blogger following mobile template not working.
  • The blogger post editor is not making realtime changes in post's html code.
Note: It is crucial to download your entire blogs to prevent any unwanted consequences.

These are known issues that are annoying blogspot bloggers since May 4th 2015. If you having these issues then wait till Google fixes it.


Wordpress Tutorial : Install Wordpress,Plugins And Themes On Windows PC

Wordpress is the most used open source blogging tool and content management system.Every blogger today is starting his/her new blog with wordpress,because it is the best blogging tool with lots of free plugins and themes.Wordpress plugins are most useful and easy to use because they make blogging easy,clean and clear.You will lots of plugins on wordpress.However if you are not using wordpress or are not associated with it then you should try it before actually buying a hosting service then installing wordpress on it.

Testing wordpress before buying a hosting service will let you decide whether or not you want to come on it to start blogging.In this tutorial I will teach you how to install wordpress on a windows based computer or laptop.After installing it,it will run the same way as it will run on a server.Also you will learn to install wordpress themes and plugins on the localhost computer.Here localhost refers to your personal computer.So let's start.

Downloads Required

How To Install Wordpress On Windows PC

  • Download and install xampp for windows ins the root directory 'C:/xampp'.Don't install anywhere else.During installation check 'Install Apache as service' and 'Install MySql as service'.
  • Now download wordpress from the above link.
  • Now extract the zip and place the 'wordpress' folder into 'C:\xampp\htdocs'.
  • Now open xampp by going to 'Start Menu>All Programs>Apache Friends>Xampp>Xampp Control Panel'.
  • The control panel will open in the bottom right section of the screen like this below.
  • Now open the default browser and type in the address bar 'localhost/phpmyadmin' and press enter.
  • The phpmyadmin control panel will open.Now click on 'Databases'.
  • Under 'Create new database' enter 'wordpress' and click 'Create'.Your database will be created.
  • Now create a user for this database.Click the the wordpress database on the left then click 'Privileges' on the top tabs.


  • Then click 'Add a new user'.In 'Host' choose 'Local'.Then enter desired username and password.
  • In 'Database for user' select none and 'Check All' the options below.Then click 'Go'.

  • Now type this address in the address bar 'http://localhost/wordpress/wp-admin/install.php'.
  • When you go to the above link then you will be asked to create a configuration file.Click the 'Create a Configuration File' button.Then click 'Let's go!'.
  • A further page will open about database information.Here enter your username and password that you entered when you created a new user.Wrongs details here will not create a mysql database connection.
  • A wordpress setup page will open.Here you will need to enter the details of your blog like name,email,user name and password.Uncheck 'Allow search engines to index this site'.Then click 'Install Wordpress'.
wordpress setup

  • After installation click 'Log In' and enter you login details.The dashboard editor will open like below.

Install Wordpress Plugins On Localhost [Windows PC]

  • Download your favorite plugins from wordpress.org.Extract the zip file and move the extracted folder to 'C:\xampp\htdocs\wordpress\wp-content\plugins'.Paste the folder in this directory.
  • Now open wordpress on your localhost simply paste this address in any browser 'http://localhost/wordpress/wp-login.php' and log in.
  • See the image above of wordpress dashboard.Click 'Plugins'.For example I have downloaded and installed yoast plugin so I need to activate it.
  • In plugins click 'Installed plugins'.Click 'Activate' below any plugin to activate it.

wordpress plugin installation

  • The yoast plugin is a seo plugin which optimizes your content for seo.You can see it is working on localhost windows pc.By this method you can install any wordpress plugin on localhost.

Install Wordpress Themes On Localhost [Windows PC]

  • First download your favorite themes.
  • Then extract the zip file and paste the extracted folder in 'C:\xampp\htdocs\wordpress\wp-content\themes'.
  • Now again open wordpress in local host and click 'Appearance'.The theme that you put in above directory will be visible here.
  • To apply that theme just click 'Activate' below it.After activating click 'Visit site' to visit your blog.

  • You can fully customize a wordpress template by adding custom menus,widgets,header and own javascript code.
Advantages

  • Installing wordpress on localhost will give you same experience as you will get from a paid wordpress hosting.
  • You can create your own blog on localhost and customize it and later you can upload it to web hosting server.
  • This method will let you decide whether or not you want to buy a wordpress hosting.
Share this article if you like it.

Google Authorship Markup Not Working On My Website/Blog : How To Fix


Nowadays you can see google+ profile pictures under website/blog links in google search.That picture below the website/blog means that website has a verified author and owner who own and writes for that blog.This is known as google authorship markup and it is automatically verified for blogspot domains associated with a google plus profile.This problem is most common when you change your blog's name servers that is you move to a custom domain from blogspot.

Web hosts other than blogspot needs to verify their email on that website domain otherwise google authorship markup will not work on their website which means your google+ profile picture will not show up in search results below your website links.

Why Google Authorship Markup Is Not Working On My Blog
Google verifies your authorship through two methods.Out of which you have to choose at least one to verify yourself as the owner and author of your blog.These two methods are.

1.The rel=”author” Tag : This tag tells the google bot that you are the owner of a website where you put this tag.This tag can be put inside any link or any image.This tag can be implemented as following.

<a rel=”author” href=www.pcnexus.net/p/about_29.html>About Me</a>

You can put this tag anywhere on your blog/website.It is important to put at least two or three of these tags.

2.Custom Domain’s Email Verification : This is another method by which you can verify yourself as an owner of your website.You should have a valid email address on your website’s custom domain for example if your site is www.abc.com then your email would be your_name@abc.com.You need to verify this email.

Note : If your blog is hosted on blogger with a blogspot domain then there is no need to add the rel=”author” tag in your blog.But make sure to upgrade your blogger profile to google+.

Note2 : You can use google structured data testing tool to check whether authorship is working  on your site or not.Most times the authorship works on your website but profile picture doesn’t show up in search results.This happens due to non verification of the email.

Check Google Structured data testing tool. On this page enter your website's address to check whether authorship is working or not.You can see in the image below.Two green sentences are showing that everything is okay.


How To Fix The Problem
To fix the google authorship  markup problem you need to do following things.

1.Upload a google+ profile picture on google+.Make sure to upload a square image by dimensions like 250x250 pixels.
2.Create a “About Me” page on your website or blog and add your google+ profile picture (128x128) pixels or 100x100 pixels with the following hyperlink.

<a rel=”me” href=”your_google+_profile_link”>Your Full Name As On google+</a>

Look the image below and create the page exactly like it.


2.Now put a link of “About Me” page in your website’s footer as follows.

<a rel=”author” href=”link_of_about_me_page”>About Me</a>

This link works like it points to the about me page which contains your profile link with a rel=”me” tag.Which seems like author=me=your google+ profile which tells google bot that your are the verified owner of your blog.

Verify Your Email On Custom Domain
As I told earlier in this post that you need to verify your email on custom domain.You can verify your email by going to the link below.

Verify email for authorship.

On this page enter your email address on custom domain and click “Sign up for authorship”.You will receive a link to verify your email address.Open your email and click on the verification link that google sent you.

Add Website’s Links To Your Profile
1.Go to google+ profile and edit it and add your links of your website and about me page under the links section.To finally complete the process.

Now finally goto the structured data testing tool again and enter your blog’s address.You will see that google authorship markup is working on your site.Wait for 24 hours to let google bot crawl your website with updated google authorship markup data.Your profile picture will now be visible in search results below your website links.

How To Fix 404 Redirect Error After Moving Blogger Blog To A Custom Domain

How To Fix 404 Redirect Error After Moving Blogger Blog To A Custom Domain Getting a 404 redirect error means that your naked domain is not redirecting to your website.It will show you an error that url not found if you enter your website’s naked domain in the address bar of a browser.A naked domain is domain without prefix ‘www’.Suppose your website is www.abc.com then naked domain will be abc.com.But if your website is not configured properly to redirect your website’s naked domain to your original domain then you will get a 404 redirect error everytime you put the naked domain in address bar.

404 redirect error

This problem becomes very serious when goes unnoticed because people like to enter naked domain more directly into the web browser to reach a website.Suppose someone does the same thing for your website.Then when he will enter the naked domain of your website in a browser he will get a 404 redirect error and may even think that the blog is no longer exist.This error decreases your website’s traffic in days and in nights.This 404 redirect error occurs when you move from blogger to a custom domain while the blog still hosts on blogger.

If you have recently moved to a custom domain from blogger then you will get this 404 redirect error.But don’t worry it is easily fixable.The tutorial is for blogger blog having a custom domain like .net,.com or any TLD(Top Level Domain) but is hosting on blogger.

Fix 404 Redirect Error For A Blogger Blog On A Custom Domain

1.Login to your blogger account.
2.Select your blog and goto its “Basic” settings.
3.Under “Publishing” you will see “Blog Address”.Click “Edit” in front of your blog’s address.

blogger redirect

4.Here you will see an unchecked option “Redirect abc.com to www.abc.com”.
5.You have to check this option to fix the 404 redirect error.Click save after checking it.
6.Now your naked domain abc.com will redirect to www.abc.com.
7.You can check yourself by entering your website’s naked domain directly into web browser and you will see that it will redirect to your original domain.

Following above steps will fix the 404 redirect error for your blogger blog after moving to a custom domain.

Infolinks Intext Advertising Program : Review


Infolinks is an intext advertising program which helps to monetize your blog by providing text ad links on your blog.Infolinks is the leader in intext ads and they support blogger,wordress,joomla,drupal etc. and almost any platform that supports infolinks javascript code.To use infolinks on your website you have to signup first and then have to add atleast one website or blog.Your website should have atleast 10 well written posts to get approved.Your website will be approved within 2 days.If you don’t have an infolinks publisher account then sign up first for the program.

Infolinks SignUp

I am writing this review because most people still thinks that infolinks is not good for monetizing your blog,but after reading this review you will know that infolinks is the best intext ads advertising program available today.

infolinks

How Does Infolinks Works
After getting your website approved you have to integrate the infolinks javascript ad code on your blog by getting the code from your infolinks account.When you login into the account you will see an integrate tab.Click on it and select the website for which you want to get the code.That code smartly scans your blog’s text and turns them into double underlined links.When someone clicks on these links you get paid.Infolinks pays 70% of the revenue share which is greater than any intext advertising program.You can check your daily earnings for all websites separately.

Does Infolinks Really Pays
Yes infolinks really pays and they pay on time and on a monthly basis.Some says that infolinks is a scam,but this is not true.They are saying this because they are unable to generate any income or do not know about infolinks.Infolinks is not a scam,it is a genuine advertising program which is the best intext advertising program available today.They are ready to help us everytime we want them to help and they also provide their best to help monetize your blog.They make every publisher feel special by providing quality support whenever needed.Here is the infolinks payments proof.

infolinks payments proof

How Can I Receive Payments
Infolinks provides us 6 ways to receive our payments.We can choose the payment method which suits us best.The 6 payment methods are eCheck,Paypal,BankWire,ACH(for US bank accounts only),Western Union and Payoneer.

1.eCheck : If you select eCheck to receive your infolinks payments then your payments will be directly deposited to your bank account.You have to submit your bank details in infolinks account to receive payments via eCheck.The minimum threshold for eCheck is $50 dollars.You will be charged $6 dollars plus 2% of total earning as currency conversion.eCheck is a very low cost method of receiving payments.

2.Paypal : You can receive your payments via paypal.Paypal may or may not be available in your country.Check it before selecting this method.The minimum threshold is $50 and $1 fee is charged for US paypal transactions plus 2% of your total earnings.If you are outside of US then you will be charged $10 plus additional fee charged by paypal.

3.BankWire : It is direct transaction of funds from infolinks to your personal bank account.The minimum threshold is $100.You will be charged $25 plus 2% of total earnings as currency conversion.BankWire is available where bank accounts use SWIFT system.

4.Western Union : You can receive your infolinks payments via Wetern Union Money Transfer.The minimum threshold is $100 and $15 will be charged plus 2% for currency conversion.

5.ACH : ACH is only available for US bank accounts.It is a kind of Bank Wire transfer.The minimum threshold is $50 and there is no fee charged by infolinks but some bank charge transaction fee.

6.Payoneer : It is an infolinks prepaid debit master card and is accepted where mastercard is accepted.You can also use it at most ATMs.You need to signup for payoneer account.For more information about infolinks payoneer check this.

As you see Infolinks is providing us 6 ways to receive payments.That is the reason for which infolinks is best.You can see many popular advertising programs like

Google Adsense : Only pays via check.
Chitika : Only Pays via paypal & check.

But infolinks pays via 6 ways which is not provided by any other advertising program.Accordig to me infolinks is the best intext advertising program to monetize your website.If you have any problem about any topic regarding infolinks then feel free to ask.

How to Get Quality Backlinks for Your Site to Drive Traffic

How to Get Quality Backlinks for Your Site to Drive TrafficBacklinks are one of the best ways to increase your page rank and raise your position in search results. The more links you have, the higher your page rank. However, not all links are created equal. The links you get must be from quality sites, or else they may actually bring down your page rank.

backlinks

Quality backlinks come from high-ranking sites in your niche.Quality backlinks are responsible for driving quality traffic to your site.Not sure where to start? Here are some of the best ways to get quality backlinks for your site to drive traffic.

1.Guest Blogging
The preferred method for getting quality backlinks is to write guest posts for other blogs that have a high page rank. You write the post, and the blog admin publishes it with your byline and a link to your site.
The key to successful link building with guest posting is to target blogs in your niche that have a high page rank and high traffic. The more authority the guest blog has, the more you will benefit from having it in your link portfolio.

2.Commenting on Blogs and Forums
If you can't get a guest post published on an authority blog, you can try commenting on it instead. Commenting on blog posts and forum threads on high-quality, high-ranking sites can give you a valuable link. The key is to write a comment that adds value to the conversation -- not just a comment that says "I agree" or "Nice post".
When you leave a link with your comment, make sure it's relevant. Spamming sites with your link will only work against you and bring down the value of the link.

3.Submitting to Article Directories
There are dozens of article directories on the web, and if you submit content for them, you can get back a link to your site. However, there are many spammy directories out there, so it is important to choose your submissions wisely. Be sure to choose a directory that has a high page rank, and submit unique content to each directory. Duplicate content can bring down the value of your link.You can submit your content to article directories like ezinearticles.

4.Social Media Marketing
Links on some social media sites, like Pinterest, can help boost your page rank. There has long been speculation that the more +1's you get on Google+ the more of a boost your page will get. However, the majority of social media sites do not generate quality links for your site.
The reason these sites are still useful is that they help you to connect with readers who may share your content and get it linked out to other sites because of the exposure. Share your content regularly on social media, and devise a strategy for growing your followers to get the most exposure for your content.
Generating quality backlinks is one of the best ways to raise the page rank of your site and to get more traffic. While these strategies are not difficult to employ, they will take time if used correctly by sourcing the most high-quality sites.

How do you get high-quality backlinks for your site? Share your most successful strategies in the comments!
Sarah Clare is a writer and oversees the site projectmanagementsoftware, where she has recently been researching task management. In her spare time, Sarah enjoys cooking and scrapbooking.

SEO Tips To Optimize Website For Bing

SEO Tips To Optimize Website For Bing SEO is a method of optimizing any website to rank well in search results.Without a good seo a website cannot rank well.Optimization requires several factors like correct usage of keywords,html tags,image optimization,internal links etc.Every blogger only optimizes his or her website for google only.Well it is natural as google is the internet giant and controls over 60 percent of the searches made worldwide.So its the prime duty of any blogger to optimize his/her website for google first then for others.

If you cannot learn to optimize your website for google then optimizing for bing will not help you.If you are new to blogging then first learn the basic working of search engines that is how they crawl,index and rank webpages.Start with learning about google's search engine first then for bing.However if you know about the prior then it is better to talk about bing search engine.Bing is a search engine owned by Microsoft.Most of you don't even have a Microsoft account to learn about bing services.Bing is ranked number 2 in the world after google.So it is worth to optimize your website for bing alongside with google.

Optimization Tips For Bing

bing search engine

1.Submit Website To Bing
Before you can start optimizing your website for bing you need to submit it on bing.To submit your website goto the below link and enter the address of your website.Unless you submit your site to bing it can't be indexed by it.This is the most important step and submission should be done regularly not only once in a lifetime.

Submit website : Click To Submit

2.Title Tags
Always use title tags <title></title> within your blog posts' html.A title tag tells the search engine what the blog post is about.Bing search engine spider reads this title tag and learns about the content.It then crawls and indexes the pages accordingly to reach right audience.

3.Quality Content
Write high quality which is knowledgeable and helpful to your audience.Search engines love high quality unique content.If you practice this regularly then you will notice traffic from all major search engines including bing.Also keep updating your website on a daily basis.Keep all your website's posts interlinked with each other with hyperlinks to one another and never add a "no follow" attribute to it otherwise search engine won't crawl it.Interlinks helps to index more pages of your website.The search spider crawls to various pages through interlinks and indexes them.

4.Use Bing Webmaster Central
Like google webmaster tools bing also provides its own webmaster tools.To register for bing webmaster central you need to have a Microsoft account.Then you need to login and add your website.On adding your website you need to verify ownership for your site.Bing will provide you three ways to verify you can choose the best that suits you.By using webmaster central you can know get detailed information about how your website is performing in bing,what keywords drawing traffic to your site and from where the audience came.You will know when you will login.

5.Use Bing Keyword Research Tool
Use bing keyword research tool to get keyword ideas for bing search.It is like google keywords tool.Also to use it you need a Microsoft account to login.By getting keyword ideas you can rank well in bing but don't forget google.

6.Flash Files And Objects
Google doesn't love flash content much but if you want to use it then you can but do not overuse.Flash can add interactivity within your website which is a plus point to be crawled by bing.

Verdict
You won't notice anything effective until you apply above tips.Also you won't get results as you get with google.But optimizing your site for both is good practice to reach more and more audience.Always be aware of search engine algorithm updates.

5 Tips To Increase Any Blog's Readership To Drive Traffic

5 Tips To Increase Any Blog's Readership To Drive Traffic Readers are the users who reads or follow a blog regularly for getting something new everyday.They are like the readers of  a book published by a good publisher.Any blog not having a good readership can't score good to drive traffic.Users are of two types.First ones are the visitors that comes to your site through search engines and second ones are the regular readers of your blog.You should optimize your blog for both kind of the users and you should not underestimate any of them.Well no matter whenever you start blogging you will get atleast one type of traffic that is from search engines.

But most bloggers always forget about the regular readers.They also forget to work on increasing their blog's readership as most of them think that it is not as much useful.But it is totally wrong.Increasing blog's readership means building trust among your readers who comes to your site for fresh content.If you have a heavy readership then you should know how to keep it ongoing by keeping your site updated with fresh content.If you increase your blog's readership then you are actually helping your audience to directly come to your site via email links without searching for your blog in search engines.

To increase the blog's readership I have some tips for you.

1.Fresh Content
Always update your blog at regular intervals with fresh content.Fresh content means genuine posts that are useful for your blog's readers.Do not paste copied content or content that seems to befool your audience.Content should be knowledgeable and practical and it should be well researched.Fresh content is like a magnet that attaracts your readers.So always create good and genuine content.

2.Email Subscription
Encourage your audience to subscribe to your website's mailing lists.Once they get subscribed to this service they will be notified everytime you update your blog with new content.You can use a javascript popup widget which appears when someone visits your website.It is like a form and you can ask them to subscribe to your websites's mailing list.This will increase readership.

3.FeedBurner Account
Share the links of your feedburner account.You can share them wherever possible.It is best to share these links on social networks like facebook and google plus.Also when you post fresh content you can put a subscription link in between your posts.An example is given below for a direct subscription to my blog.


The link is also same for your blog all you have to do is to change the "Pcnexus" and put your feedburner feeds name.This is a direct link if someone clicks on it he/she would be asked to enter their email for subscribing to your website's mailing list.This steps will increase your blog's readership to a greater extent.The more you share this link the more will be the probability.

4.FeedBurner Feed Count
A feedburner feed count is a small animated rectangular box that displays total number of your readers currently subscribed to mailing list.You should put this chicklet on your blog as it delivers a good impression on your blog's visitor.The higher the readership the higher the impression.To get a chicklet follow the steps below.

feedburner readership count
  • goto feeds.feedburner.com
  • choose your desired website.
  • now you will be taken to feedburner dashboard.
  • click on "Publicize" tab.
  • on the left hand side click "Feed Count".
  • Select "Blogger" in "Use as a widget in".
  • Copy the code and paste it in your blog.
5.Guest Posting
When you guest posts on another website always make sure that you are providing the subscription link of your website so that readers can subscribe.This is a good practice and is also helpful.If You Want to write for us then check the "Guest Posting Guidelines".

The readership won't increase within few days.But it will keep on increasing if you follow all the above tips.Be careful not to share your subscription links on spammy sites.Be social share it.

How To Use HTML Tags For Better SEO

how to use html tags for better seo Proper html tags when used within a post boost the seo structure of any website.Without use of html tags seo will be incomplete or raw.Html tags when used correctly will make your blog posts more clear to your blog’s audience and to search engines.Html tags works differently for e.g. some of them are for search engines and some of them are for the users.

Ignoring the power of Html tags will not buy you good results for your blog.You should start using appropriate html tags if you are a novice blogger because you will feel the difference and start getting good results during the start period of your blogging career.So I am telling you some basic html tags that are compulsory for every post you write on your blog for good seo.

The main goal of using html tags is to make your blog posts more clear and vivid to search engines and to your blog’s audience.Always keep in mind that doing good seo is remarkable but do not write for search engines write for your audience first then do seo.

Basic Html Tags And Usage For Good Seo
1.Title Tag : The title tag provides a small description of your blog posts in a single line to search engine spiders and crawlers which you put in the html code of your blog post.This tag is for search engine spiders to tell them what the content is about.You should always include this tag in your blog posts because it is the first to be included.

Declaration : <title>My Blog Post’s Title</title>


2.Bold Tag : This tag is used to make the selected text bold and is represented as <b>.It is very useful to highlight your blog’s keywords in bold black text.Few keywords of your website should have this tag because it is useful for both search engines and users.Search engines will mark it as useful and it adds an extra point to seo and your blog’s audience will see it as highlighted text and get attaracted towards it.Use this html tag to highlight everything important in your blog posts.

Declaration : <b>Some Text To Be Bold</b>


3.H1,H2,H3 Tags : These are headline tags and represents different sizes from very large to very small.You should use H1 or H2 tag for atleast one keyword.This adds an extra point to seo.H1 tags represents the largest text basically used for headlines and subtitles within posts.It can’t be used as an alternative to title tag.Every blog’s subtitles should be large enough to convey their description visually to the audience by their large and catchy size.

Declaration : <H1>My Blog Post’s Subtitle</H1>

4.Image Alt Tag : This tag is used for images.When images are not visible on your blog this text is displayed.However alt is not a tag it is an image attribute and is a short description of your image.Basically atleast one keyword should be used in alt attribute for getting search traffic from your blog’s.For optimizing images check this tutorial for image seo tips.

Declaration : <img src="image name" title="image title", alt="small image description">

5.Miscellaneous Tags : These tags includes the underline tag <u> and bullets tag <li>.The underline tag is used to underline some text can can be used with bold and H1 tags at once.The bullets tags is used for substeps under a headline or subtitle.Use <li> tags if you are declaring a process of various steps.If you use blogger then you don’t have to declare them you only need to select them from the editor.

Blogger Seo Features Tutorial

These are some basic html tags that are meant to be used in every blog post you write.These tags will help boost your blog’s seo and also good for your website’s audience because they see a well written article formatted with correct tags.Share this article if you like it.


How To Optimize Images For Better Traffic [SEO]

Images can drive decent traffic to your website.Most bloggers always forget to optimize the images which they use in their articles.Well images if optimized can contribute in driving traffic to your website.

The Google bot or other search engine spiders can't understand any picture.It's a blogger's duty to describe the image properties so that the Google bot will know what the picture is about.The Google bot can't read pictures but it can read the decription in the "alt" tag.

An "alt" tag is used to tell the image description to the Google bot."Alt" tag description depends upon the type of image.For e.g. if you have an image of a lion which is roaring then the tag will describe the image as "roaring lion".However the title tag will remain only lion.Both the title tag and the alt tag should not be same.

If you use blogger then you can easily add title and alt tag to any image.Just click on any picture and click "properties".Then just add the title tag and the alt tag and click ok.You can check the title tag will work just hover the mouse over that image and you will see the title text.Just hover the mouse cursor over the lion below.


blogger image options

roaring lionblogger image properties


Also keyword overuse is not recommended as it will affect your website negatively,so do not overstuff the alt tag with keywords.

How Better Image Search SEO Drives Traffic

Image search SEO is similar to content related SEO.In content related searches users directly type in Google search to search their desired content.This search mostly works by matching the keywords related to the content.So that's how users find their content.But it also depends on to what extent the search query is related to the content on your website.

Now same as above people do make searches for images also.They use Google search,Yahoo search and Bing searchThese search engine spiders can't understand any picture but they read the description in alt tag.So always describe the picture correctly.Search queries matching the appropriate keywords will show up in search results.

So never ignore optimizing the pictures.Always do SEO for them because they can drive serious traffic to your website. 

How To Get Google Sitelinks Quick And Easy Way

How To Get Google Sitelinks Quick And Easy Way
Google sitelinks are the website's links that are shown below a it's name when someone searches for that website by its name in Google.Earning Google sitelinks is like earning a reward for your site.Well these sitelinks are automatically created  by Google and there are no other means to get them except right and hard work.

sitelinks to pcnexus

To get Google sitelinks is also not very hard.You can earn upto 2 sitelinks for your website having page rank 1.The secret behind getting Getting Google sitelinks is hidden in better optimization of your website.The most important part is the linking of content with links.A website should have enough intra links to connect the relevant content on the website itself through hyperlinks.

Intera linking of your content is necessary.By intra linking I mean linking all the posts on your blog through hyperlinks.You should put hyperlinks to previous posts when you write new posts.It helps users to navigate easily on your site because you are providing then relevant links.

Here are some tips to get Google Sitelinks quick and the easy way.

1.update frequency : update your website on a daily basis with fresh content and regularly ping your website.Do not use copied content and optimize your website with good SEO.Use various tools to check the SEO structure of your website.Frequently updating your blog will build more interlinks within your blog.

2.linking content : monitor your best posts having the largest page views.Then write content related to that posts for a month.Then link these posts via hyperlinks to different posts on your blog.What actually happens when some posts start getting many pageviews or the posts which are mostly viewed by users on your site then they become sitelinks and will be shown in Google search.

3.build decent traffic : also a decent traffic is also required.A decent and constant traffic doesn't matter whether it is low will also help you gaining Google sitelinks.You might have a low list of subscribers who visit your blog daily in search of new content.So to keep the traffic constant you should write for these subscribers on a daily basis.It will help you to keep the traffic constant till your blog becomes a big professional site.

4.build backlinks : build backlinks to your own blog as much as possible.Commenting on other blogs with a solution post is the best way to earn backlinks.To whatever which lets you to earn precious backlinks.Share your posts on facebook,twitter,stumbleupons,Google + and pinterest.

Getting Google sitelinks means that your website is doing good.It also shows your website as a professional one.Getting Google sitelinks mean that Google wants that more users should reach your blog that's why it has given you sitelinks.


Inbound Writer : Online Content Optimization SEO Tool

Every blogger's aim is to optimize his content at its best.By optimization we mean making the content more SEO friendly,so to get good ranks in search engine results.Any written topic should be well structured in terms of tags,keywords and images.Inbound writer helps to optimize content by providing you suggestions about your content.

To get started first of all you have to signup at Inbound writer to create an account.After account creaion log into your Inbound writer account and click "Create New Document".A new page will open with an editor in which you can write your article along with a title.The interface is just similar to wordpress and blogger.

On the left side bar you will see a colourful SEO meter.This semi circular meter gives you the score of your articles after researching your article.The greater the number the higher the post will be SEO friendly and optimized.

How Inbound Writer Works

Inbound writer researches your article by using a number of sources like social web,websites and forums to collect best keywords and keyword phrases which will be good for your article's SEO.After a complete research Inbound writer provides you the score,the keywords,focus terms,keyword density and high rated terms.
Focus terms are keywords that you have used in your article more than once.It automatically tells the focus terms but you can also add your own focus terms that are repeated in your article.
Inbound writer also suggest you to use high rated terms related to your content to get the best SEO.

inbound writer

Benefits Of Inbound Writer

  • It is a free online SEO tool used for content optimization.
  • Wordpress and blogspot bloggers can use it easily and a wordpress seo plugin is also available for wordpress bloggers.
  • You can optimize upto 8 posts per month,beyond this you can take a plan which will cost you around 20$ dollars.
  • Real time SEO scores and suggestion.
  • Best online SEO tool for content optimization.
  • Helps to improve search engine ranking.
For more info click to www.inboundwriter.com

New Blogger Features Made Website's Seo Easy

new blogger features made website's seo easy Blogger a product of google is the best platform for blogging.The reason behind calling it best is that blog running on blogger are customizable and supports various third party functionalities.That’s why most bloggers choose it to start blogging.Every user of blogger can customize his/her blog according to his/her needs due to blogger being highly customizable.Talking about other free web hosting services like wordpress,tumblr etc doesn’t stand a chance against blogger.Even most successful bloggers recommend blogger to start with because they once used it before becoming famous. In late April the old blogger interface was retired and google introduced new interface to let its users to know detailed information aout their blog’s performance also the new interface includes some new features that will make your on site SEO very simple.In old interface the process was totally without any shortcuts.Here I am writing about some new blogger features that will help every blogger.These features are.

1.Search Description : it is like meta description.Meta description is what search engine spider reads and know what your content is about.It then crawls and index that content according to its ranking.Now in blogger whenever you write a new post everytme you will see search description on the right side.You can right in this what your post is about or just copy a little part of your post and paste it.And if your post appears in search engine results then this search description will show up below your blog’s post link and searchers can easily understand what your post is about.So you don’t need to put a meta tag in page’s html blogger will let you to do it the smarter way.

2.Change Of Blog’s Address : now with new interface you can change your blog’s address easily.But there is some problem in it.Changing the blog’s address after a very long time will have a bad effect on blog’s ranking because during this time the search engines has indexed your blog’s pages in the name of old blog’s address.So if you change the address at this time it is not good to do it because if you do it then with new blog’s address the old content will become unavailable.If your blog is new and you haven’t written much content then you can change your blog’s address.But if you really want to change the address then you have to first submit a link removal request to google which are all indexed by the search engine spider then you have to republish the html code on new blog’s address.Go to settings and choose basic settings then select change address.

3.Alt Tag Shortcut For Images : the google spider can’t understand any image but it can read the alt tag description which describes what the image is about.Now there is a shortcut for this also without altering the html code.In blogger posts right click on any image and click properties.A dialog box appears asking you to fill up the alt tag field and title tag field.You can assign the alt tag which describes the image.

  alt text

4.Permalink For Posts : permalink is short form of permanent link.This is the permanent link for every blogger post.The new thing is that you can also create permanent links to your posts.There are two options.First one is automatic which means when you write a post it will be assigned an address automatically.If you want to manually assign a link then click on ‘Permalink’ and then choose custom url.For example if I want to create a custom url for this post then it will be like, new-blogger-features-made-website’s-seo-easy no https allowed,no special sign allowed.Only words separated with a dash are allowed in a custom url to create.After entering the words click done to create the custom link.Creating custom links with targeted keywords will ensure better search engine rankings. Blogger is getting smarter day by day to help bloggers to optimize their content easily.I wrote this post to help bloggers who are new to blogging as this will help them to know more about blogger.More blogger features coming soon.

blogger permalink 

Don't Let Google Panda Update Affect Your Blog:How To Recover Tips

google panda

As we all know Google uses a search algorithm for displaying results on the web.Google panda is the change in this algorithm.This algorithm displays results according to the ranking of the website or blog.Google panda undergoes various updates within a single year.This new panda update can affect your website positively or negatively.Google panda is different from older algorithms because it considers the entire website instead of ranking websites on basis of several pages.If you see that your website's traffic is going down day by day then it might be affected by the latest panda update.However you can recover from it and restore your website to its previous state.Here are some tips.

1. Never ever publish copied content:

If you are regularly posting copied content to your website then your website will be a simple bait for google panda to affect it negatively.It will slap your website if you are regularly doing this.In most cases your website will be removed from google search listings.Google panda is not interested in copied content.So better be careful.Do make an internet research about what you are posting and what you are thinking about it.Match your thinking with the research if both matches then find different ways to post it.

2. Use internal links:

You can use internal links within your website post.Internal linking means that you are connecting your website's different posts through hyperlinks.These links make any post more detailed and informative.Most webmasters say that Google panda affect these links positively.

3. Regularly update your website:

Google and every search engine loves fresh content.You should update your website on a regular basis.Regularly updating your blog or website will improve your google ranking provided that the content is unique and fresh.Share on various social networks like google plus, facebook. Put a +1 button on your website.A +1 by anybody lets panda to see that content positively.It is good for your posts.Social networks can help increase your google ranking because likes,comments,follows and +1's are seen in a positive way after analyzing these variables google panda will think that something is special about what you wrote.

4.Write unique and quality content:

Think and think about what you write.Keep in mind the uniqueness and quality of your website's content.Your content should be unique,it should not be copies.Also write correctly avoid spelling mistakes and use technical words.Mistakes in words can limit your website traffic because in this case panda will prefer more accurate words.For example if you wrote google instead of google.

5.Optimize your website:

Choose a simple design and avoid spammy templates.Sometimes templates contain spam codes which can let panda to negatively affect your ranking.Remove any inappropriate links and content.Remove specially that content that is not under your website's niche.A simple and sober website helps to increase your ranking because a simple website with quality content loads faster.The faster your website loads the more it will be favoured by your readers.

6.Make your content SEO friendly:

If you are writing a post then it should be SEO friendly.Avoid too much of keyword stuffing.Too much of keywords will let panda to avoid your website thereby reducing ranking.You can use the H1 tags to highlight a heading also use of alt tag is preferable in images because the algorithm panda can read the text within images written in alt="" tag.So it is better to place an alt tag in the html code of image.

If you find above tips useful then reply with comments.Your comments will be much more important which will represent your views about this post.